When reviewing architectural plans ahead of a bid, the phrase “elevator in plan” often prompts a closer look. At Kaiser Elevator, we know that what’s shown (and not shown) on elevator plans can make or break schedules, budgets, and even code compliance. Having delivered precision-engineered lift solutions for everyone from real estate developers and general contractors to facility managers and consultants, we’ve seen firsthand how misreading an elevator in plan leads to last-minute RFIs, expensive change orders, or even failed inspections. Let’s break down how to confidently interpret these drawings—going step by step through symbols, dimensions, and notes—so you can de-risk your project before that bid goes out.
What “Elevator in Plan” Means on Drawings
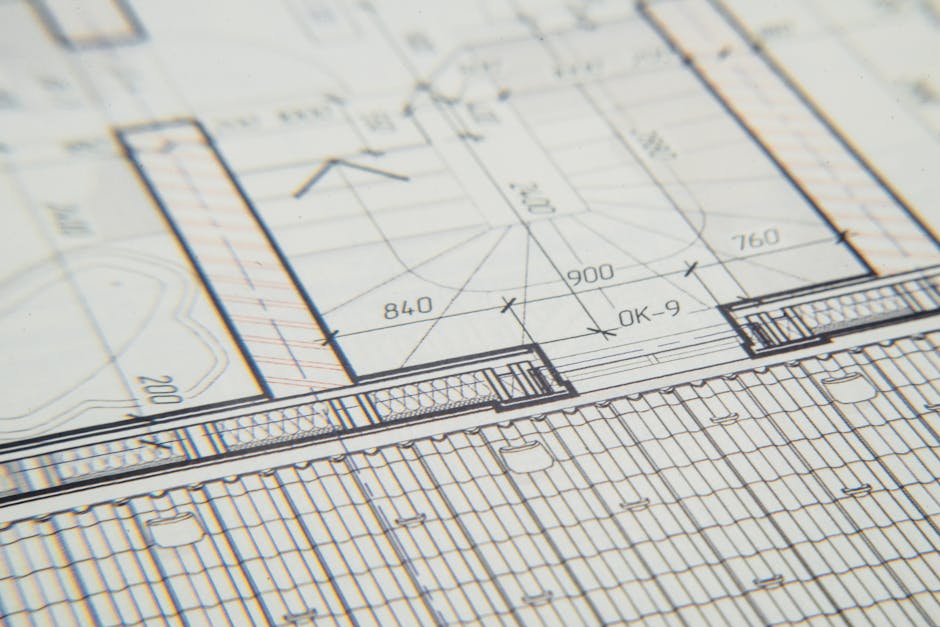
On most construction documents, “elevator in plan” refers specifically to the top-down view—the elevator’s footprint as seen from above, usually on a typical floor plan sheet. Don’t confuse this with section or elevation drawings, which show front or side views! In the plan, you are looking for the precise relationship between the shaft (hoistway), elevator car, door openings, and their context in the building core.
- Shaft or hoistway outline: Usually a heavy, solid rectangle or square labeled “ELEVATOR” or similar, representing the complete enclosure.
- Car footprint: A smaller rectangle inside the shaft, sometimes hatched or shaded.
- Door opening lines: A gap or a symbol breaking the shaft wall. For sliding doors, you may see parallel lines; for swing doors (rare in commercial), an arc.
- Dimensions and tags: Numeric callouts—widths, depths, clearances—alongside notes like PASS ELEV 1, FRT ELEV, or E-01.
- Gridlines and level references: To anchor the shaft location in the structural grid for accurate coordination.
Decoding Plan Symbols and Key Details
You cannot afford to overlook plan graphics. Here’s how we read them at Kaiser Elevator—details we watch out for in every project:
- Look for shaft alignment: Is the elevator lined up with major gridlines, columns, or stairs in the core?
- Shaft size vs car size: Is the hoistway larger than the car on all sides to allow for rails, landing entrances, and required clearances?
- Door position and swing: Does the door open into a compliant lobby space? For multi-opening cars, check both front and rear.
- Tag consistency: Are all cars labeled clearly on every level?
For more on plan complexity, check out our elevator plans checklist to see how shaft, pit, and overhead requirements tie together.

Understanding the Dimensions That Drive Bids
The elevator industry is exact. Every inch matters. Here are dimension sets you should always double-check, because missing one impacts shaft construction, floor area, and system clearance:
- Inside Hoistway (IW x ID): The clear dimensions of the shaft, wall to wall. Don’t assume “5×7 ft” is enough—depends on manufacturer, code, and elevator type.
- Car Inside (CW x CD): The actual usable car space. This impacts passenger capacity, stretcher accommodation, and compliance.
- Door Width and Location: Critical for ADA compliance, tenant move-in, and lobby design. Always cross-check against code requirements.
- Pit, Overhead, and Machine Space: Though not always on the typical plan, these are referenced in separate detail sheets (usually section A7xx or the like)—be sure references are clear and lines up with elevator and structural plans.
We see too many GCs price a shaft off a “clean” car size, only to learn the actual hoistway needs to be six inches deeper for code-compliant guide rails or safety standards. Always coordinate with an elevator specialist to validate these details.
What Do “Elevator in Plan” Notes Really Mean?
Text around the elevator symbol is as critical as any line. Common notes you’ll spot and what you need to do about them:
- “By elevator contractor”: Indicates components the elevator vendor supplies—car, machine, guides, cabling, doors (sometimes).
- “By GC” or “By others”: Shaft construction, pit and overhead buildout, power feeders, beam embed placement are generally on the base build scope.
- “Refer to elevator shop drawing/supplier”: Final shaft size deferred until after award—a high risk point. Don’t guess, request a preliminary drawing for the bid.
- References to other sheets: “See A7xx for details” means you need to pull that page and reconcile pit depth, machine room size, and structural openings.
For more detail about base-scope vs elevator-scope, see our perspective on coordination for local code compliance.
A Step-by-Step Checklist to Review Elevator Plans Before Bidding
- Count and Identify: Verify number and type (passenger, service, freight, hospital, car stacker) of elevators on all applicable floors.
- Check Shaft Sizes: Compare plan dimensions against manufacturer data or realistic ranges. Watch for tight tolerances—ask questions if “fits on paper” but seems undersized in reality.
- Trace Every Callout: Follow “see detail” bubbles to referenced sheets; don’t ignore small notes that can contain crucial pit, overhead, or embed information.
- Coordinate With Structural and MEP: Confirm gridline alignment, ensure slab and beam openings match both elevator and structural documents, and check for main power and ventilation stub-ins.
- Validate Accessibility: Make sure door widths, car sizes, and lobby clearances meet ADA (or local code) standards.
- Engage Early: Bring in an elevator specialist for planning sets or pre-bid advice. A preliminary layout drawing can prevent expensive surprises post-award.

Plan-Related Pitfalls That Blow Up Budgets
Misreading elevator plans is a source of costly pain. Here’s what we’re often called in to fix on projects that come to us late:
- Shaft Too Small or Misaligned: Shafts squeezed to the minimum car size without clearance for guides, equipment, or code-mandated space. Misaligned with core grid, causing structural conflicts.
- Pit and Overhead Errors: Plans with shallow pits or insufficient overhead for elevator travel—especially risky in high-speed or heavy-capacity applications.
- Machine Room Headaches: Equipment rooms scaled for generic utility closets, not for actual equipment or code clearances. This happens most in early design stages and renovation scope.
- Spec and Plan Misalignment: Specs may mandate a higher speed, capacity, or finishes than what’s reflected on the schematic plans. Always reconcile before pricing.
Using Vendor Layout Drawings to Protect Your Bid
Relying only on plan-sheets to price shaft, pit, and power provisions is always risky. We produce detailed CAD or BIM elevator layout drawings so you can see:
- Exact hoistway requirements and tolerances
- Pit depth and sump pit configuration
- Overhead clearance, and top-of-shaft needs
- Machine room placement for non-MRL (machine room less) and MRL lifts
- Main power and ventilation requirements
Having this before final bid means you’re less likely to eat schedule or cost overages when change orders hit.
How Kaiser Elevator Helps You Avoid Mistakes
We understand the small details in elevator plans that end up being huge after you sign a contract. With value-engineered solutions, our in-house engineering team delivers shop drawings that fit the building’s real envelope, comply with codes, and preempt surprises. We support developers, GCs, and consultants across:
- Initial design assist and layout review
- Coordination with architects and structural teams
- Turnkey installation with rigorous pre-checks for shaft and machine room readiness
- Modernization and field-verified upgrades for complex renovations
- Comprehensive maintenance and 24/7 emergency service
All our systems meet American safety codes, and we’re always available for a plan review—especially when “elevator in plan” looks vague, undersized, or is overloaded with footnotes.
Final Thoughts: Protecting Your Margin Starts on the Plan
It’s easy to get caught rushing through plan review in the heat of pre-bid. But a hands-on approach, tracing every note, confirming every dimension, and getting shop drawings early is where top GCs and developers avoid costly mistakes. If you’re looking for more region-specific considerations, explore our resources on hurricane-ready elevator systems in Florida or seismic-ready elevator planning in Washington State. Every market has its own local twists, but the core process of reviewing elevator in plan is universal—and mastering it saves money, time, and frustration.
If you want an expert set of eyes on your next set of elevator plans, get in touch with us at Kaiser Elevator. Our team will help ensure you’re bidding on real, buildable layouts—not fiction drawn in plan view.